Realizing data integration functionality using Node-RED

table of contents
Preface
Thank you for your help.
This is CIMTOPS Corporation.
This time, Panasonic FS Engineering Co., Ltd., an agent for i-Reporter, has contributed an article titled "Realizing data integration functions using i-Reporter and Node RED," which describes a technology that simplifies (low-codes) the construction of integration between i-Reporter and external systems.
Node-RED is a tool that allows you to intuitively create automated apps and systems without any programming knowledge. You can connect blocks called "nodes" in your browser to visually design the flow of data.
If you are having difficulty integrating with external systems using ConMas Gateway, we hope you will read this article.
Greetings
nice to meet you.
My name is Koba from Panasonic FS Engineering Co., Ltd., a distributor of i-Reporter.
We wondered if we could make using data in the field easier and smoother. With this in mind, we came up with a method of data integration using i-Reporter and Node-RED.
When I actually tried it, I found that automatic data integration was possible with simple settings, which significantly improved work efficiency. I wanted to share this convenient method with everyone, so I wrote an article about it.
This book will surely be useful for those who want to make better use of i-Reporter data or who want to flexibly integrate their systems using no-code tools.
Please be sure to watch until the end!
Background to the establishment of this collaboration
A client contacted us about using i-Reporter as the UI for their internal system. We introduced them to a method of integration using Gateway and Python, and they proceeded with their investigation.
However, the introduction of i-Reporter was postponed for the following reasons:
Reasons for abandoning the introduction of i-Reporter
- Cost of learning Python
I don't have the time to learn Python. - Complexity when using the Gateway function
It is necessary to write code directly in multiple files outside of the tool, which makes management complicated and maintenance difficult. - Creating complex SQL is a burden
When creating complex SQL, it is necessary to write it in Python, which increases development time. - Unclear access destination
It is difficult to know where to access the necessary data, making management difficult. - Unclear relationship between i-Reporter and Python files
The call destination from i-Reporter is not directly linked to the Python file, which places a heavy burden on the operation.
Proposed solutions
- I don't have time to learn Python
→Consider using no-code or low-code development tools. - Reduced code management burden when using Gateway
→ We are looking for a way to call and return directly from i-Reporter. - Eliminates the confusion of where to access
→ Simplify data management and acquisition, and consider more intuitive access methods.
Features of Node-RED
- Visual Programming
It provides a flow editor that runs on a web browser, allowing you to visually build workflows by dragging and dropping nodes. - JavaScript support
Customized processing can be implemented by writing JavaScript functions. - Node.js-based runtime
It provides a lightweight and flexible environment that can run on a variety of devices. - JSON format flow management
The flows you create are saved in JSON format, making them easy to reuse and share. - MQTT/TLS support
Starting with version 0.14, MQTT nodes can establish TLS connections, allowing for more secure communication.
Node-RED is widely used in the fields of IoT and business automation because even beginners can intuitively build systems using it.
[Reference] Node-RED (Wikipedia)
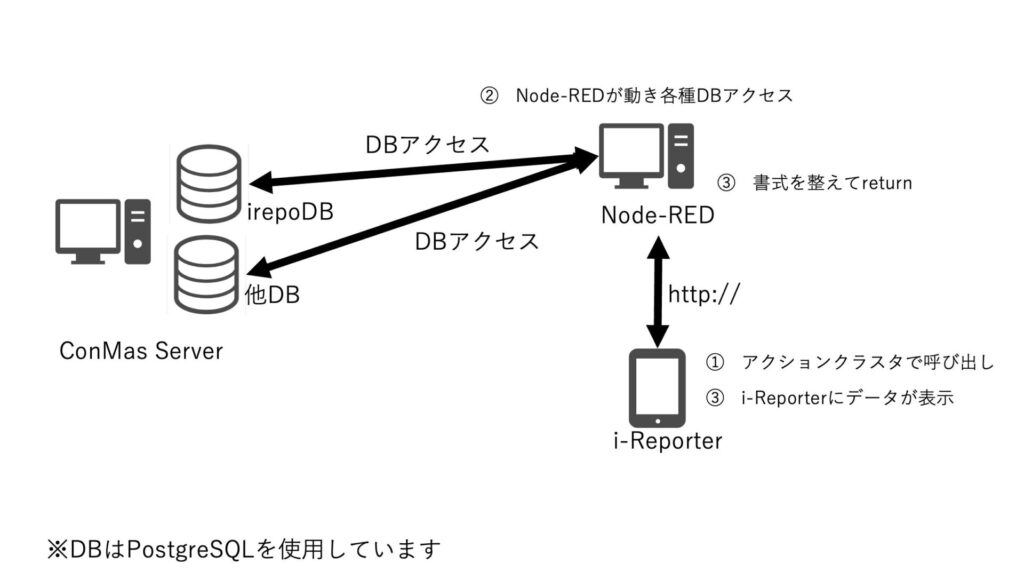
Sample operating environment
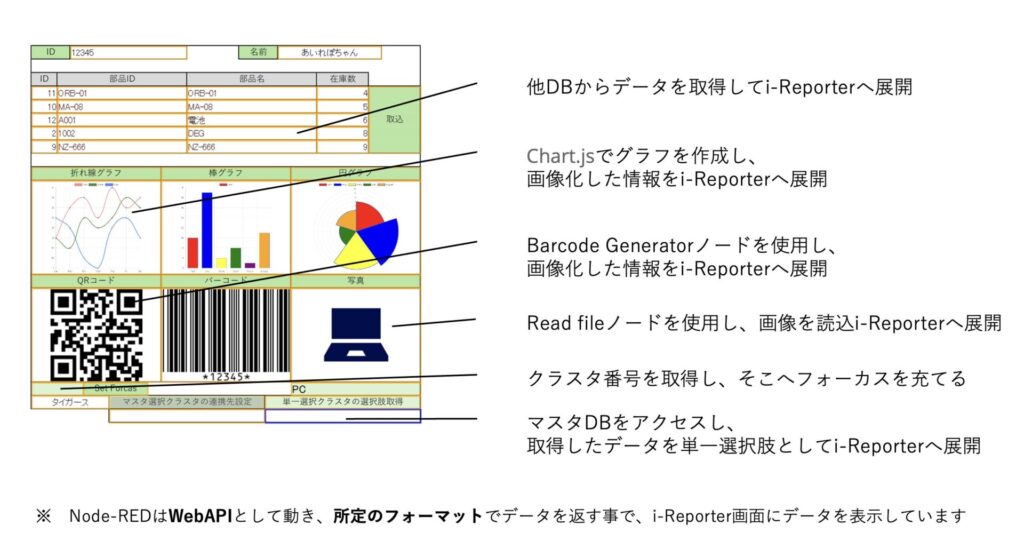
Sample screen
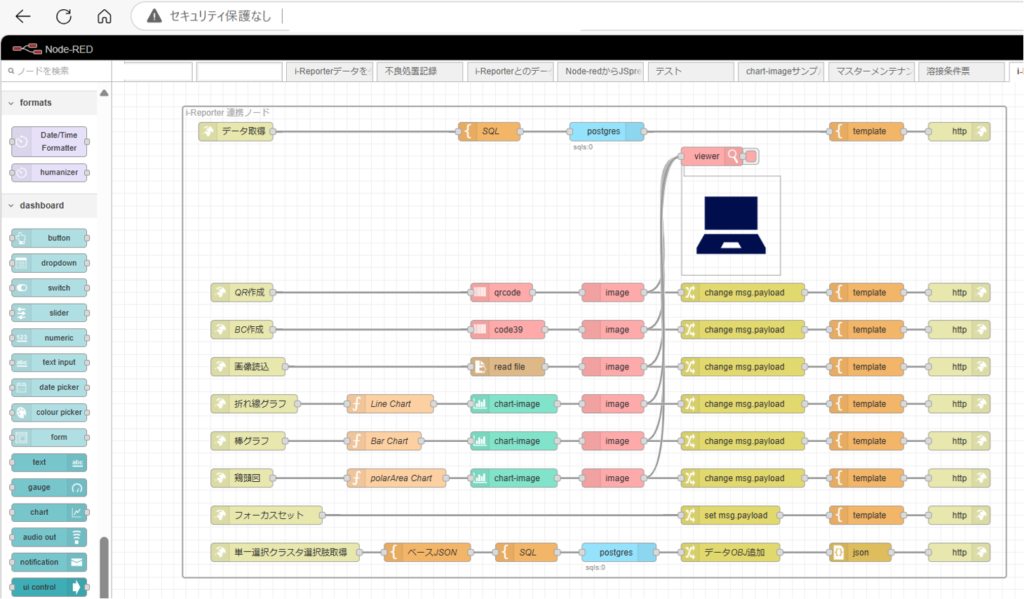
Node-RED flow
Operation image
summary
Benefits of using Node-RED
1. Reduced education costs
Node-RED is a low-code development tool that allows even those with little programming knowledge to create flows relatively easily, making it possible to rapidly develop systems while keeping learning costs low.
2. Simple file structure
It eliminates the need to write DB connection strings, manage Action files, and create script files, which were previously required.Since all processing is completed within Node-RED, file configuration is simplified and management is easier.
3. Supports complex SQL statements
Since you can write SQL statements within Node-RED, you can also perform complex data operations such as transaction processing, outer and inner joins, SELECT, INSERT, and UPDATE.
4. Clear access
Because the Gateway address and Node-RED API address match, the system connections are simplified, making operation and management easier.
5. High scalability
Node-RED is a highly extensible development tool that allows you to easily implement the following functions:
- Reading and writing CSV files
- Integration with other companies' Web APIs
- Send notifications to email and chat
- Acquiring PLC data
In this way, by utilizing Node-RED, it is possible to improve development efficiency and build flexible systems.
Key points for using Node-RED
1. Create a WebAPI with Node-RED
Node-RED allows you to easily create Web APIs with low code. Visual flow design allows for intuitive development.
2. The JSON format return value is important
The key is to prepare the return values of the WebAPI created with Node-RED in the appropriate JSON format. It is important to design a unified data structure to ensure smooth processing on the client side.
By keeping these two points in mind, you can build a more efficient system.
Other news for our readers:
If you are already using this service, please share any additional information you have.
We would also be very grateful if you could send us your opinions and feedback.
i-Reporter linkage sample explanation
The following sample will explain the following items:
Also, please refer to the separate website for information on how to install Node-RED, how to add the necessary nodes, and how to operate Node-RED.
In addition, in the node description section, explanations of nodes that are the same as those in the previous sample have been omitted.
Please refer to the previous sample.
- Displaying PostgreSQL data in i-Reporter
- Display the QR code on i-Reporter
- Displaying image files
- Set focus
- A set of single-choice cluster options
Displaying PostgreSQL data in i-Reporter
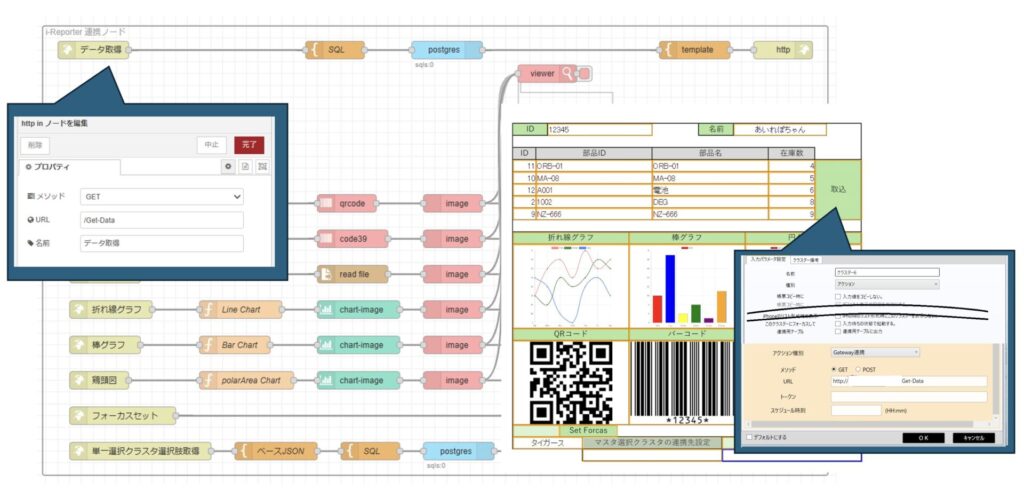
Flow Image

overview
This is a sample that retrieves PostgreSQL data and displays it in i-Reporter.
Retrieve data from the inventory table and display it on the i-Reporter screen.
Node to be used (node to be added)
In this sample, the following Node-RED nodes are added to access PostgreSQL.
- node-red-contrib-re-postgres
Node configuration
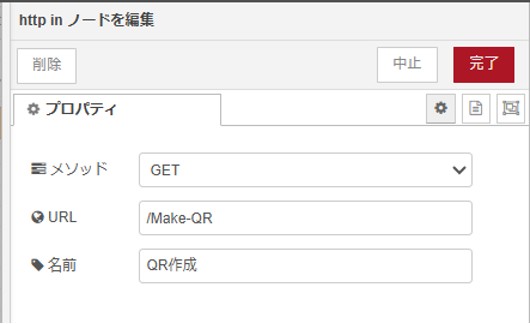
http innode
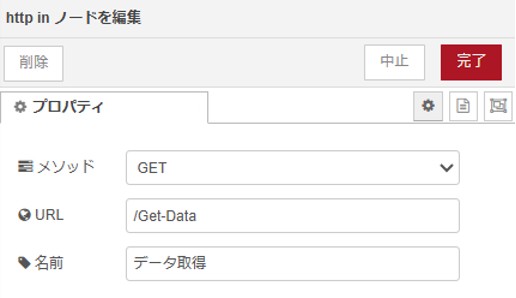
Method: Use the same method as i-Reporte
URL: Specify the URL endpoint.
Name: Enter a name that is easy to understand as a comment.
template node
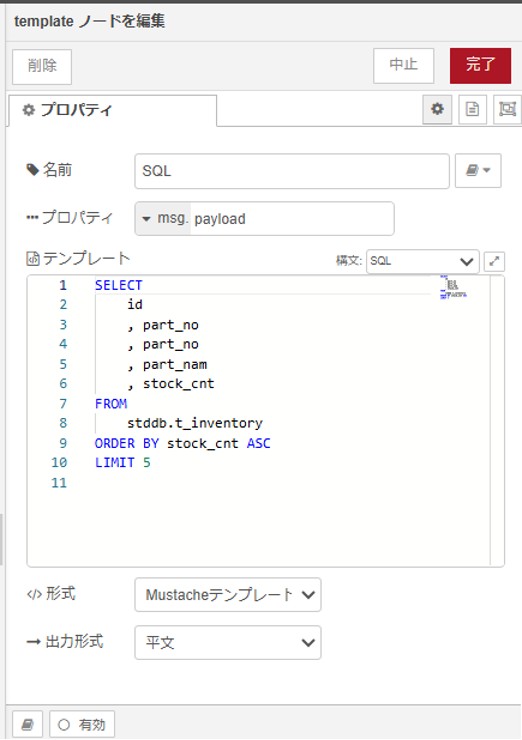
Enter the SQL statement to access the database.
Name: Enter a name that is easy to understand as a comment.
Property: The variable name to which the template content will be assigned.
The variable the next postgres node is requesting is msg.payload
So, assign it to msg.payload
Format: Specify a Mustache template
Output format: Specify plain text
postgres node
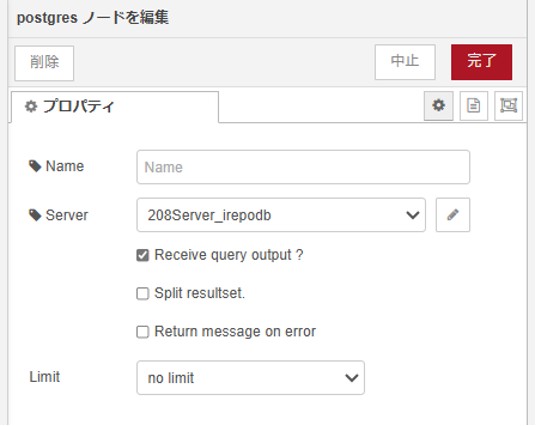
Name: Specify a comment for the Postgres node
Sewver: Specify the name you gave to the database connection information below.
Receive query output?: If you want to use the retrieved data in a subsequent flow,
Check the box
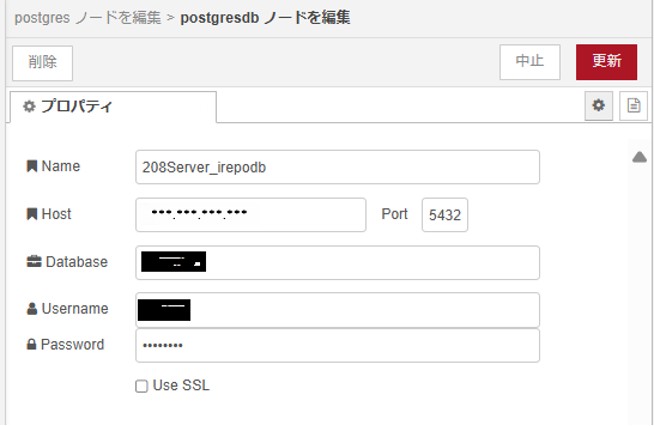
Name: Name the database connection information
Host: Specify the server name and IP address.
Database: Specify the database name.
Username: Specify the username
Password: Specify the password
template node
Create a string to return the acquired data to the i-Reporter cluster.
Create the data in this JSON format
http response node
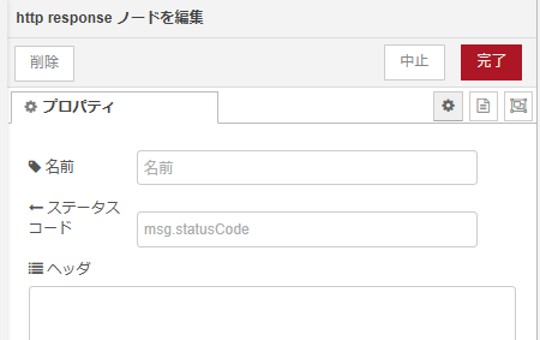
This is a node that is paired with http in
Use the default
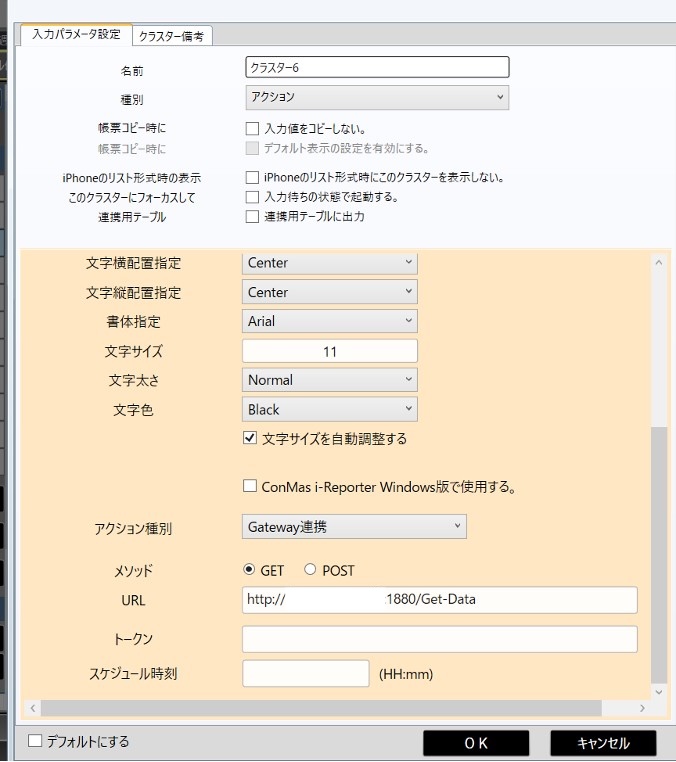
i-Reporter settings
Source files
[
    {
        "id": "e5093ff27efd600e",
        "type": "http in",
        "z": "3b9d424424fa37f2",
        "g": "beaca7f0903c3bfb",
        "name": "データ取得",
        "url": "/Get-Data",
        "method": "get",
        "upload": false,
        "swaggerDoc": "",
        "x": 280,
        "y": 4220,
        "wires": [
            [
                "a016c039f0157d8f"
            ]
        ]
    },
    {
        "id": "a016c039f0157d8f",
        "type": "template",
        "z": "3b9d424424fa37f2",
        "g": "beaca7f0903c3bfb",
        "name": "SQL",
        "field": "payload",
        "fieldType": "msg",
        "format": "sql",
        "syntax": "mustache",
        "template": "SELECT\n    id\n    , part_no\n    , part_no\n    , part_nam\n    , stock_cnt\nFROM\n    stddb.t_inventory\nORDER BY stock_cnt ASC\nLIMIT 5\n",
        "output": "str",
        "x": 690,
        "y": 4220,
        "wires": [
            [
                "4cc5f7592a8bf6ff"
            ]
        ]
    },
    {
        "id": "4cc5f7592a8bf6ff",
        "type": "postgres",
        "z": "3b9d424424fa37f2",
        "g": "beaca7f0903c3bfb",
        "postgresdb": "1429ffd5a6603e33",
        "name": "",
        "output": true,
        "perrow": false,
        "rowspermsg": "1",
        "return_on_error": false,
        "limit_queries": "0",
        "limit_by": "payload",
        "limit_value": "1",
        "limit_drop_intermediate": false,
        "limit_drop_if_in_queue": false,
        "outputs": true,
        "x": 880,
        "y": 4220,
        "wires": [
            [
                "85397862ed216455"
            ]
        ]
    },
    {
        "id": "85397862ed216455",
        "type": "template",
        "z": "3b9d424424fa37f2",
        "g": "beaca7f0903c3bfb",
        "name": "",
        "field": "payload",
        "fieldType": "msg",
        "format": "json",
        "syntax": "mustache",
        "template": "{\n    \"result\": {\n        \"code\": 0,\n        \"description\": \"Success!!!\"\n    },\n    \"apply\": [\n        {\n            \"sheet\": 1,\n            \"cluster\": 2,\n            \"type\": \"string\",\n            \"value\": \"{{{payload.0.id}}}\"\n        },\n        {\n            \"sheet\": 1,\n            \"cluster\": 3,\n            \"type\": \"string\",\n            \"value\": \"{{{payload.0.part_no}}}\"\n        },\n        {\n            \"sheet\": 1,\n            \"cluster\": 4,\n            \"type\": \"string\",\n            \"value\": \"{{{payload.0.part_nam}}}\"\n        },\n        {\n            \"sheet\": 1,\n            \"cluster\": 5,\n            \"type\": \"string\",\n            \"value\": \"{{{payload.0.stock_cnt}}}\"\n        },\n\n        {\n            \"sheet\": 1,\n            \"cluster\": 7,\n            \"type\": \"string\",\n            \"value\": \"{{{payload.1.id}}}\"\n        },\n        {\n            \"sheet\": 1,\n            \"cluster\": 8,\n            \"type\": \"string\",\n            \"value\": \"{{{payload.1.part_no}}}\"\n        },\n        {\n            \"sheet\": 1,\n            \"cluster\": 9,\n            \"type\": \"string\",\n            \"value\": \"{{{payload.1.part_nam}}}\"\n        },\n        {\n            \"sheet\": 1,\n            \"cluster\": 10,\n            \"type\": \"string\",\n            \"value\": \"{{{payload.1.stock_cnt}}}\"\n        },\n\n        {\n            \"sheet\": 1,\n            \"cluster\": 11,\n            \"type\": \"string\",\n            \"value\": \"{{{payload.2.id}}}\"\n        },\n        {\n            \"sheet\": 1,\n            \"cluster\": 12,\n            \"type\": \"string\",\n            \"value\": \"{{{payload.2.part_no}}}\"\n        },\n        {\n            \"sheet\": 1,\n            \"cluster\": 13,\n            \"type\": \"string\",\n            \"value\": \"{{{payload.2.part_nam}}}\"\n        },\n        {\n            \"sheet\": 1,\n            \"cluster\": 14,\n            \"type\": \"string\",\n            \"value\": \"{{{payload.2.stock_cnt}}}\"\n        },\n\n        {\n            \"sheet\": 1,\n            \"cluster\": 15,\n            \"type\": \"string\",\n            \"value\": \"{{{payload.3.id}}}\"\n        },\n        {\n            \"sheet\": 1,\n            \"cluster\": 16,\n            \"type\": \"string\",\n            \"value\": \"{{{payload.3.part_no}}}\"\n        },\n        {\n            \"sheet\": 1,\n            \"cluster\": 17,\n            \"type\": \"string\",\n            \"value\": \"{{{payload.3.part_nam}}}\"\n        },\n        {\n            \"sheet\": 1,\n            \"cluster\": 18,\n            \"type\": \"string\",\n            \"value\": \"{{{payload.3.stock_cnt}}}\"\n        },\n\n        {\n            \"sheet\": 1,\n            \"cluster\": 19,\n            \"type\": \"string\",\n            \"value\": \"{{{payload.4.id}}}\"\n        },\n        {\n            \"sheet\": 1,\n            \"cluster\": 20,\n            \"type\": \"string\",\n            \"value\": \"{{{payload.4.part_no}}}\"\n        },\n        {\n            \"sheet\": 1,\n            \"cluster\": 21,\n            \"type\": \"string\",\n            \"value\": \"{{{payload.4.part_nam}}}\"\n        },\n        {\n            \"sheet\": 1,\n            \"cluster\": 22,\n            \"type\": \"string\",\n            \"value\": \"{{{payload.4.stock_cnt}}}\"\n        }\n\n    ]\n}",
        "output": "str",
        "x": 1300,
        "y": 4220,
        "wires": [
            [
                "9d7dfb43e876a634"
            ]
        ]
    },
    {
        "id": "9d7dfb43e876a634",
        "type": "http response",
        "z": "3b9d424424fa37f2",
        "g": "beaca7f0903c3bfb",
        "name": "",
        "statusCode": "",
        "headers": {},
        "x": 1450,
        "y": 4220,
        "wires": []
    },
    {
        "id": "1429ffd5a6603e33",
        "type": "postgresdb",
        "cfgname": "Localhost",
        "hostname": "localhost",
        "port": "5432",
        "db": "postgres",
        "ssl": false
    }
]
Display the QR code on i-Reporter
Flow Image

overview
The string entered in Cluster 1 will be converted into a QR code and displayed on the i-Reporter screen.
Node to be used (node to be added)
node-red-contrib-image-tools
Node configuration
http innode
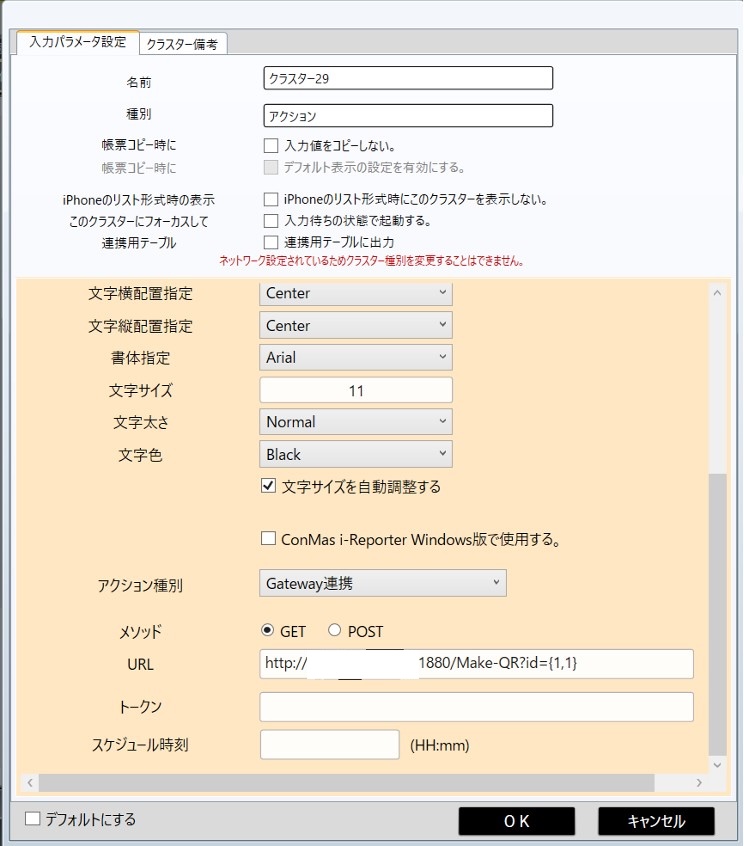
Barcode Generator Node
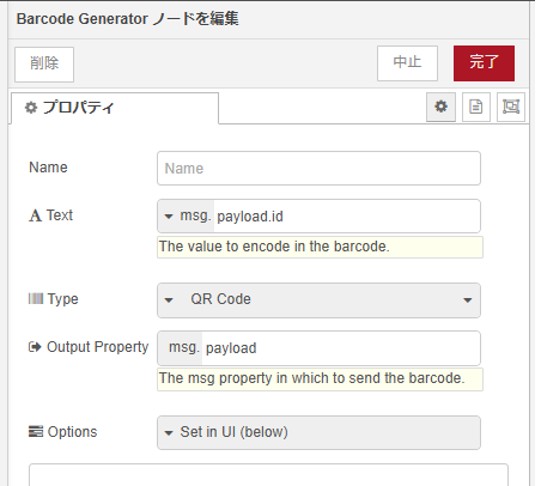
Text: Specify the string to be used as the QR code.
This time, the string will be inherited from i-Reporter as a variable called id.
The inherited variables will be entered into the variable in the form msg.payload.id
Type: Since we will be converting it to a QR code this time, select QR Code.
Image Node
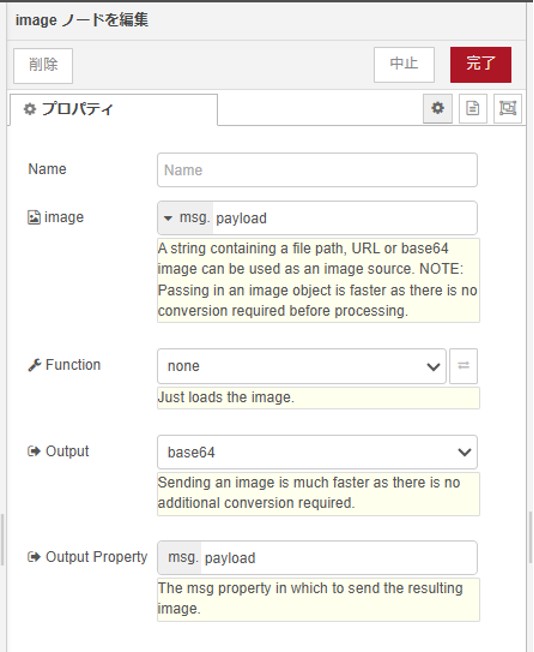
Convert to Base64 format
Output: Set base64
template node
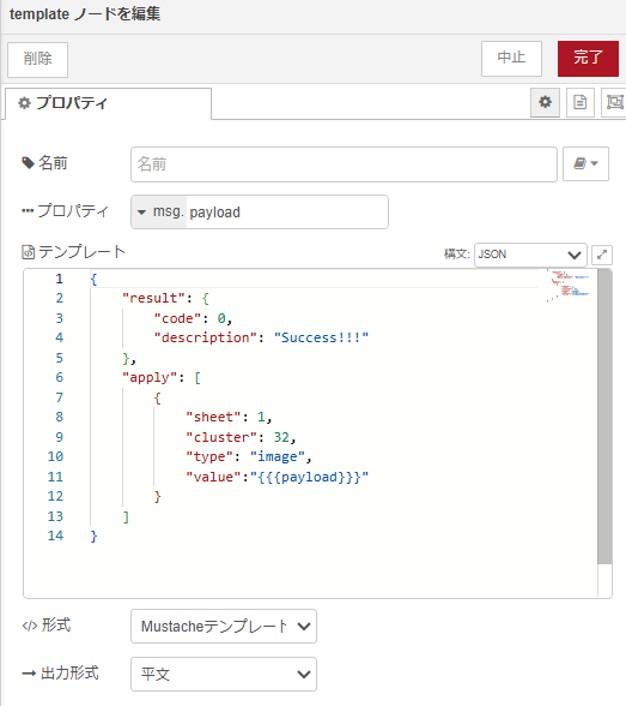
Create the data in this format
i-Reporter settings
Source files
[
    {
        "id": "e9a3130d5919b122",
        "type": "http in",
        "z": "3b9d424424fa37f2",
        "g": "beaca7f0903c3bfb",
        "name": "QR作成",
        "url": "/Make-QR",
        "method": "get",
        "upload": false,
        "swaggerDoc": "",
        "x": 290,
        "y": 4480,
        "wires": [
            [
                "659cc17a2ce81dd4"
            ]
        ]
    },
    {
        "id": "659cc17a2ce81dd4",
        "type": "Barcode Generator",
        "z": "3b9d424424fa37f2",
        "g": "beaca7f0903c3bfb",
        "name": "",
        "data": "payload.id",
        "dataType": "msg",
        "barcode": "qrcode",
        "barcodeType": "barcode",
        "options": "",
        "optionsType": "ui",
        "sendProperty": "payload",
        "props": [],
        "x": 710,
        "y": 4480,
        "wires": [
            [
                "613466464d37465f"
            ]
        ]
    },
    {
        "id": "613466464d37465f",
        "type": "jimp-image",
        "z": "3b9d424424fa37f2",
        "g": "beaca7f0903c3bfb",
        "name": "",
        "data": "payload",
        "dataType": "msg",
        "ret": "b64",
        "parameter1": "",
        "parameter1Type": "msg",
        "parameter2": "",
        "parameter2Type": "msg",
        "parameter3": "",
        "parameter3Type": "msg",
        "parameter4": "",
        "parameter4Type": "msg",
        "parameter5": "",
        "parameter5Type": "msg",
        "parameter6": "",
        "parameter6Type": "msg",
        "parameter7": "",
        "parameter7Type": "msg",
        "parameter8": "",
        "parameter8Type": "msg",
        "sendProperty": "payload",
        "sendPropertyType": "msg",
        "parameterCount": 0,
        "jimpFunction": "none",
        "selectedJimpFunction": {
            "name": "none",
            "fn": "none",
            "description": "Just loads the image.",
            "parameters": []
        },
        "x": 890,
        "y": 4480,
        "wires": [
            [
                "de0adf2b1d2ed0a6"
            ]
        ]
    },
    {
        "id": "de0adf2b1d2ed0a6",
        "type": "change",
        "z": "3b9d424424fa37f2",
        "g": "beaca7f0903c3bfb",
        "name": "",
        "rules": [
            {
                "t": "change",
                "p": "payload",
                "pt": "msg",
                "from": "data:image/png;base64,",
                "fromt": "str",
                "to": "",
                "tot": "str"
            }
        ],
        "action": "",
        "property": "",
        "from": "",
        "to": "",
        "reg": false,
        "x": 1100,
        "y": 4480,
        "wires": [
            [
                "66027e96639dfcd1"
            ]
        ]
    },
    {
        "id": "66027e96639dfcd1",
        "type": "template",
        "z": "3b9d424424fa37f2",
        "g": "beaca7f0903c3bfb",
        "name": "",
        "field": "payload",
        "fieldType": "msg",
        "format": "json",
        "syntax": "mustache",
        "template": "{\n    \"result\": {\n        \"code\": 0,\n        \"description\": \"Success!!!\"\n    },\n    \"apply\": [\n        {\n            \"sheet\": 1,\n            \"cluster\": 32,\n            \"type\": \"image\",\n            \"value\":\"{{{payload}}}\"\n        }\n    ]\n}",
        "output": "str",
        "x": 1300,
        "y": 4480,
        "wires": [
            [
                "0ba54da75fb7fd64"
            ]
        ]
    },
    {
        "id": "0ba54da75fb7fd64",
        "type": "http response",
        "z": "3b9d424424fa37f2",
        "g": "beaca7f0903c3bfb",
        "name": "",
        "statusCode": "",
        "headers": {},
        "x": 1450,
        "y": 4480,
        "wires": []
    }
]
Displaying image files
Flow Image

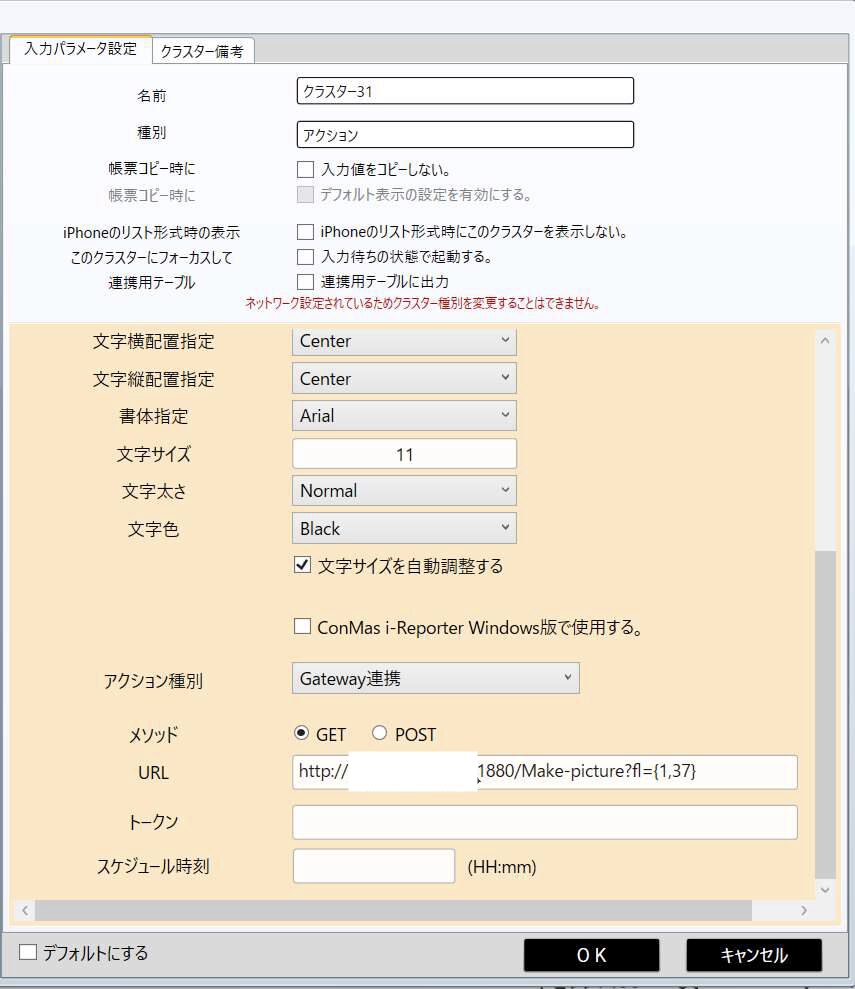
overview
The image file selected in cluster 37 is called up and displayed on the i-Reporter screen.
Node to be used (node to be added)
Add the following Node-RED nodes to retrieve image data and convert it to Base64 format.
node-red-contrib-image-tools
Node configuration
http innode
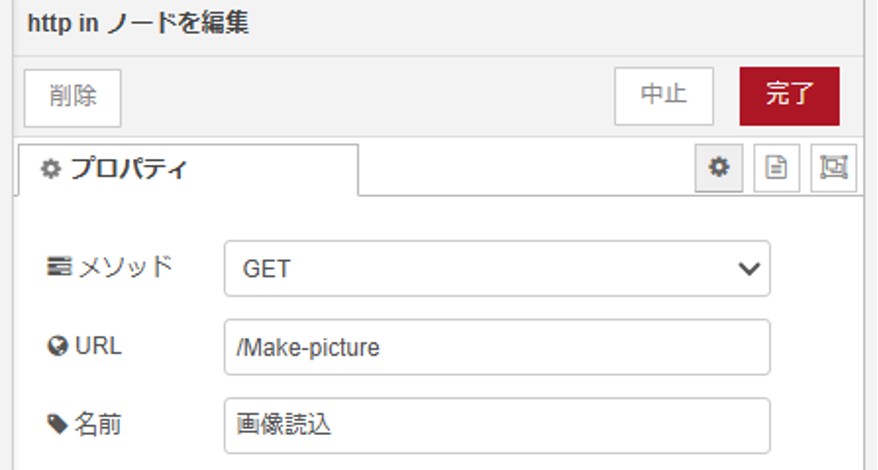
Resd file

Specify the file name from i-Reporter in the Msg.payload.fl variable
Load this file
i-Reporter settings

Source files
[
    {
        "id": "2a05cf56bd260e0a",
        "type": "http in",
        "z": "3b9d424424fa37f2",
        "g": "beaca7f0903c3bfb",
        "name": "画像読込",
        "url": "/Make-picture",
        "method": "get",
        "upload": false,
        "swaggerDoc": "",
        "x": 300,
        "y": 4600,
        "wires": [
            [
                "7dcccd963194b66e"
            ]
        ]
    },
    {
        "id": "7dcccd963194b66e",
        "type": "file in",
        "z": "3b9d424424fa37f2",
        "g": "beaca7f0903c3bfb",
        "name": "",
        "filename": "payload.fl",
        "filenameType": "msg",
        "format": "",
        "chunk": false,
        "sendError": false,
        "encoding": "none",
        "allProps": false,
        "x": 720,
        "y": 4600,
        "wires": [
            [
                "83fddd4210b2173b"
            ]
        ]
    },
    {
        "id": "83fddd4210b2173b",
        "type": "jimp-image",
        "z": "3b9d424424fa37f2",
        "g": "beaca7f0903c3bfb",
        "name": "",
        "data": "payload",
        "dataType": "msg",
        "ret": "b64",
        "parameter1": "",
        "parameter1Type": "msg",
        "parameter2": "",
        "parameter2Type": "msg",
        "parameter3": "",
        "parameter3Type": "msg",
        "parameter4": "",
        "parameter4Type": "msg",
        "parameter5": "",
        "parameter5Type": "msg",
        "parameter6": "",
        "parameter6Type": "msg",
        "parameter7": "",
        "parameter7Type": "msg",
        "parameter8": "",
        "parameter8Type": "msg",
        "sendProperty": "payload",
        "sendPropertyType": "msg",
        "parameterCount": 0,
        "jimpFunction": "none",
        "selectedJimpFunction": {
            "name": "none",
            "fn": "none",
            "description": "Just loads the image.",
            "parameters": []
        },
        "x": 890,
        "y": 4600,
        "wires": [
            [
                "ac767862aee316a1"
            ]
        ]
    },
    {
        "id": "ac767862aee316a1",
        "type": "change",
        "z": "3b9d424424fa37f2",
        "g": "beaca7f0903c3bfb",
        "name": "",
        "rules": [
            {
                "t": "change",
                "p": "payload",
                "pt": "msg",
                "from": "data:image/png;base64,",
                "fromt": "str",
                "to": "",
                "tot": "str"
            }
        ],
        "action": "",
        "property": "",
        "from": "",
        "to": "",
        "reg": false,
        "x": 1100,
        "y": 4600,
        "wires": [
            [
                "4c8d32ffa9bc11ee"
            ]
        ]
    },
    {
        "id": "4c8d32ffa9bc11ee",
        "type": "template",
        "z": "3b9d424424fa37f2",
        "g": "beaca7f0903c3bfb",
        "name": "",
        "field": "payload",
        "fieldType": "msg",
        "format": "json",
        "syntax": "mustache",
        "template": "{\n    \"result\": {\n        \"code\": 0,\n        \"description\": \"Success!!!\"\n    },\n    \"apply\": [\n    {\n        \"sheet\": 1,\n        \"cluster\": 34,\n        \"type\": \"image\",\n        \"value\":\"{{{payload}}}\"\n    }\n    ]\n}",
        "output": "str",
        "x": 1300,
        "y": 4600,
        "wires": [
            [
                "5c1d265fe120ddfa"
            ]
        ]
    },
    {
        "id": "5c1d265fe120ddfa",
        "type": "http response",
        "z": "3b9d424424fa37f2",
        "g": "beaca7f0903c3bfb",
        "name": "",
        "statusCode": "",
        "headers": {},
        "x": 1450,
        "y": 4600,
        "wires": []
    }
]
Set focus
Flow Image

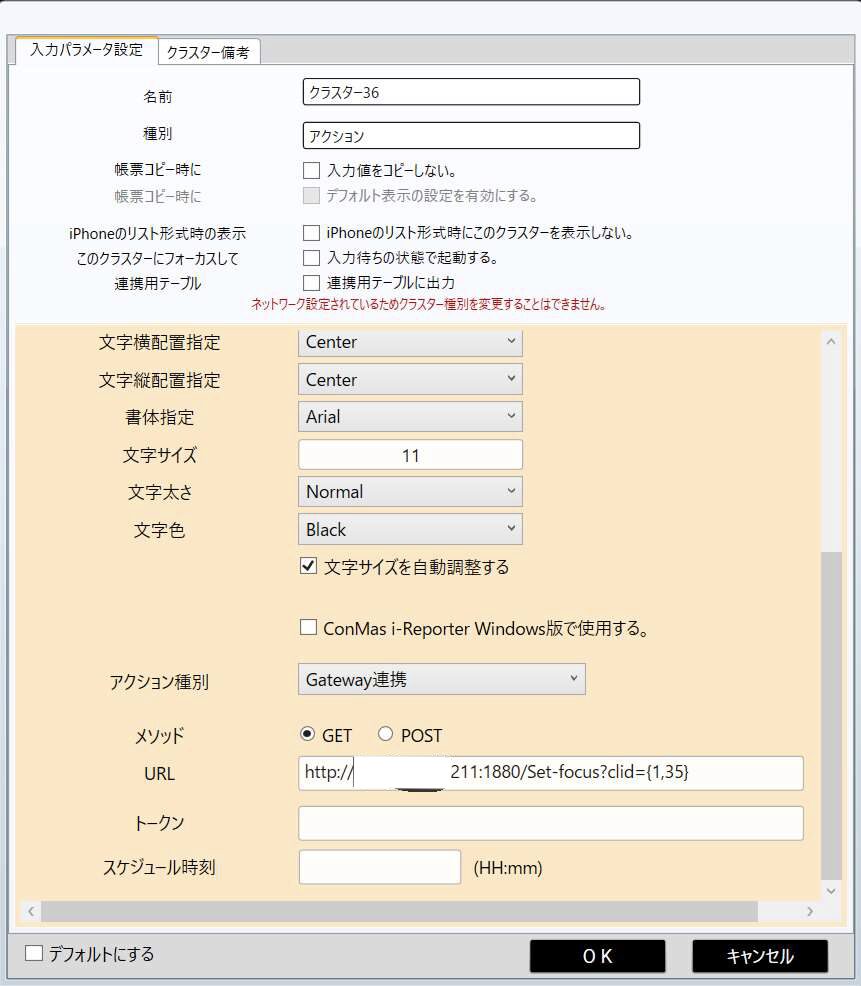
overview
Moves the focus to the cluster number specified in cluster 35.
Setting focus to an action cluster executes that action.
This method allows you to automatically shift focus after certain data inputs, ensuring a smooth workflow.
Node to be used (node to be added)
No nodes to add
Node configuration
http innode

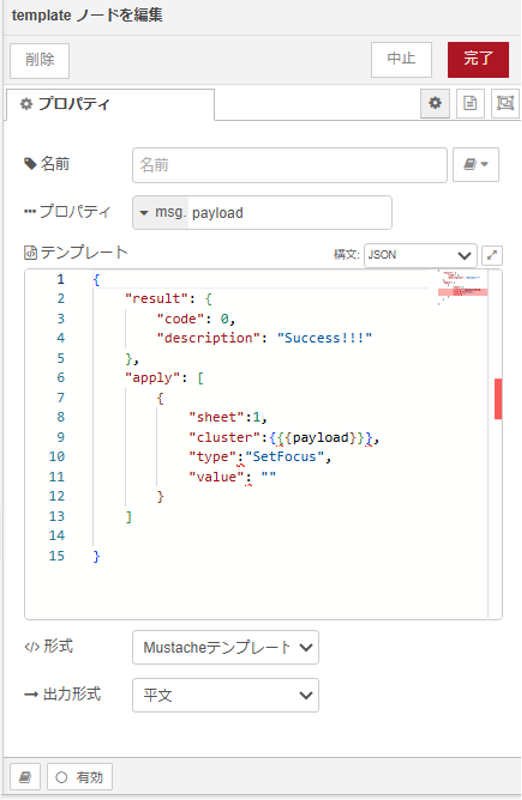
template node
i-Reporter settings
Source files
[
    {
        "id": "bce3b44ea5fd7c32",
        "type": "http in",
        "z": "3b9d424424fa37f2",
        "g": "beaca7f0903c3bfb",
        "name": "フォーカスセット",
        "url": "/Set-focus",
        "method": "get",
        "upload": false,
        "swaggerDoc": "",
        "x": 330,
        "y": 4840,
        "wires": [
            [
                "f7e7778f83b25cae"
            ]
        ]
    },
    {
        "id": "f7e7778f83b25cae",
        "type": "change",
        "z": "3b9d424424fa37f2",
        "g": "beaca7f0903c3bfb",
        "name": "",
        "rules": [
            {
                "t": "set",
                "p": "payload",
                "pt": "msg",
                "to": "payload.clid",
                "tot": "msg"
            }
        ],
        "action": "",
        "property": "",
        "from": "",
        "to": "",
        "reg": false,
        "x": 1080,
        "y": 4840,
        "wires": [
            [
                "68c4e54ba5fc454e"
            ]
        ]
    },
    {
        "id": "68c4e54ba5fc454e",
        "type": "template",
        "z": "3b9d424424fa37f2",
        "g": "beaca7f0903c3bfb",
        "name": "",
        "field": "payload",
        "fieldType": "msg",
        "format": "json",
        "syntax": "mustache",
        "template": "{\n    \"result\": {\n        \"code\": 0,\n        \"description\": \"Success!!!\"\n    },\n    \"apply\": [\n        {\n            \"sheet\":1,\n            \"cluster\":{{{payload}}},\n            \"type\":\"SetFocus\",\n            \"value\": \"\"\n        }\n    ]\n\n}",
        "output": "str",
        "x": 1300,
        "y": 4840,
        "wires": [
            [
                "92a9e28385c334b8"
            ]
        ]
    },
    {
        "id": "92a9e28385c334b8",
        "type": "http response",
        "z": "3b9d424424fa37f2",
        "g": "beaca7f0903c3bfb",
        "name": "",
        "statusCode": "",
        "headers": {},
        "x": 1450,
        "y": 4840,
        "wires": []
    }
]
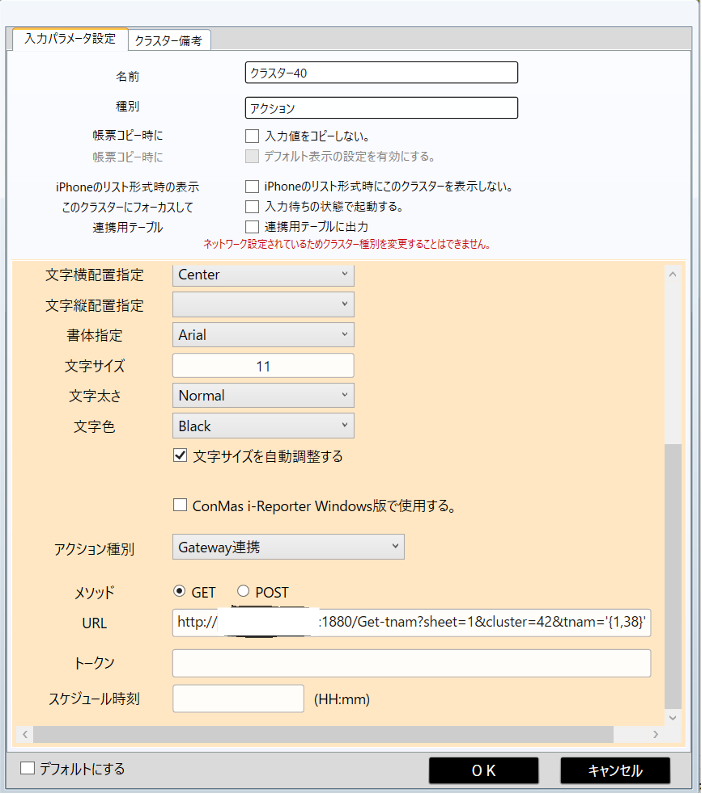
A set of single-choice cluster options
Flow Image

overview
Retrieve data from an external database and set it as choices in a single-choice cluster.
Node to be used (node to be added)
Add the following Node-RED node to access PostgreSQL.
node-red-contrib-re-postgres
Node configuration
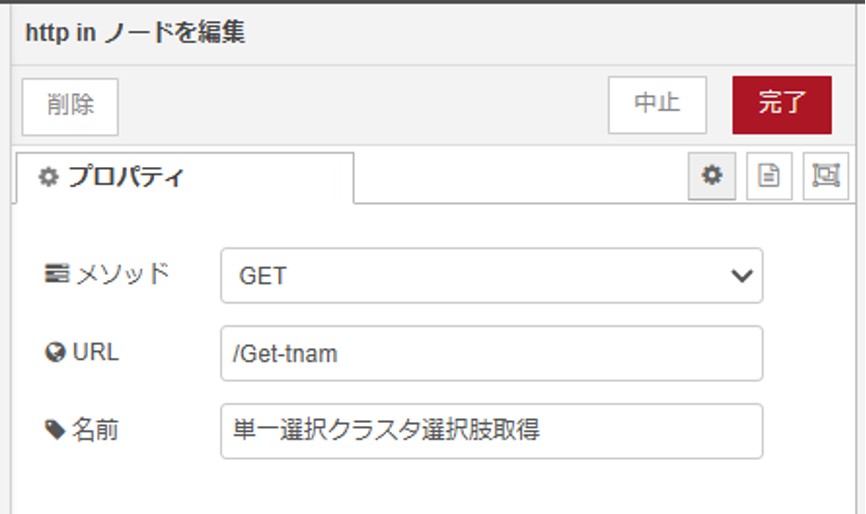
http innode
template node
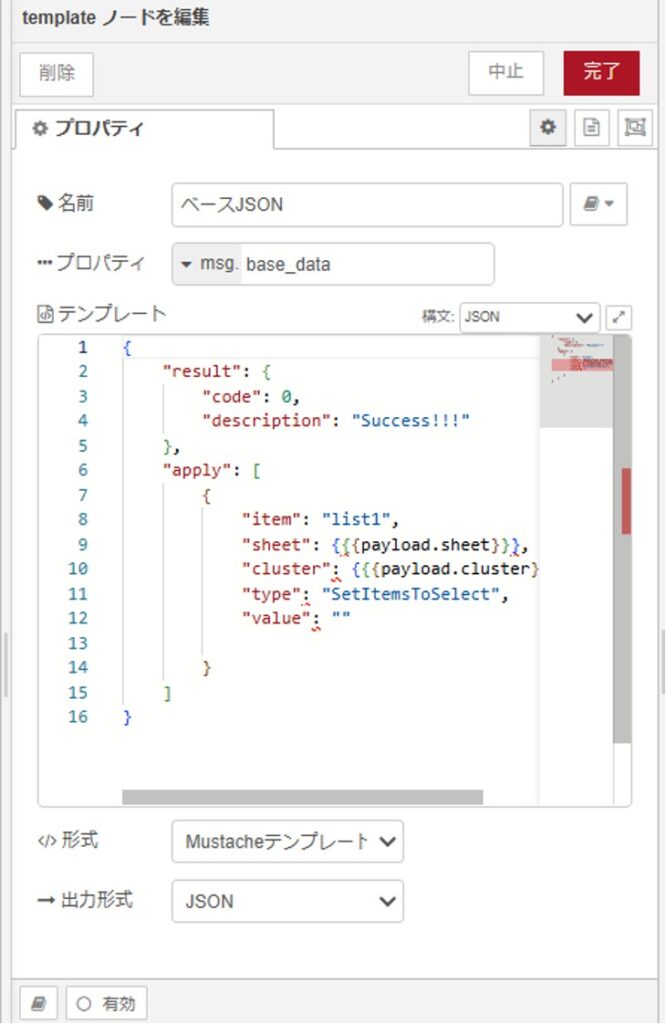
Since we are accessing the database this time, we will create a return string in a variable called msg.base_data.
Masu
Change Node
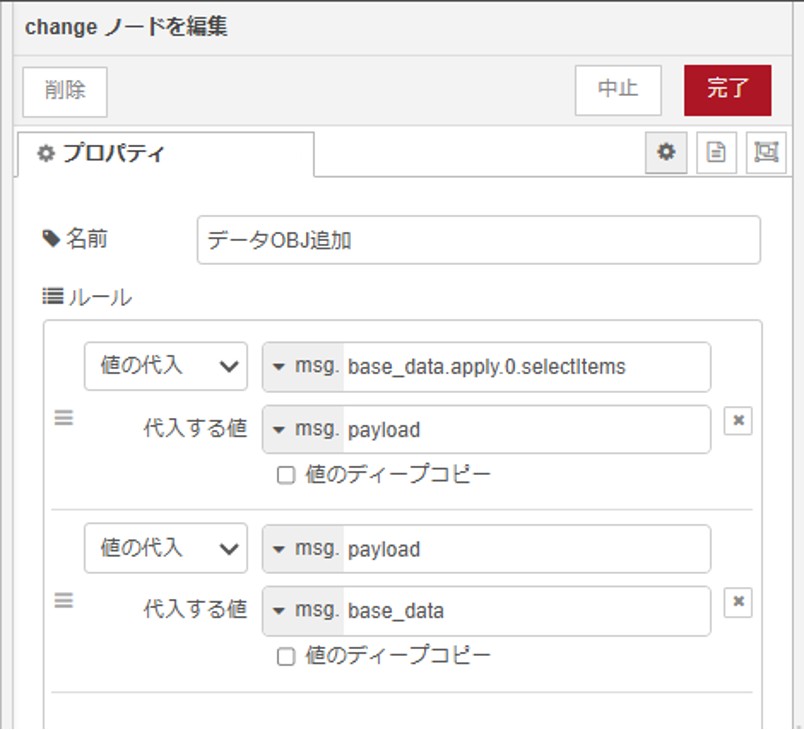
The data in the variable msg.payload obtained from the external database
Assign to msg.base_data.appy.0.selectitems
Then put msg.base_data back into msg.payload
json node
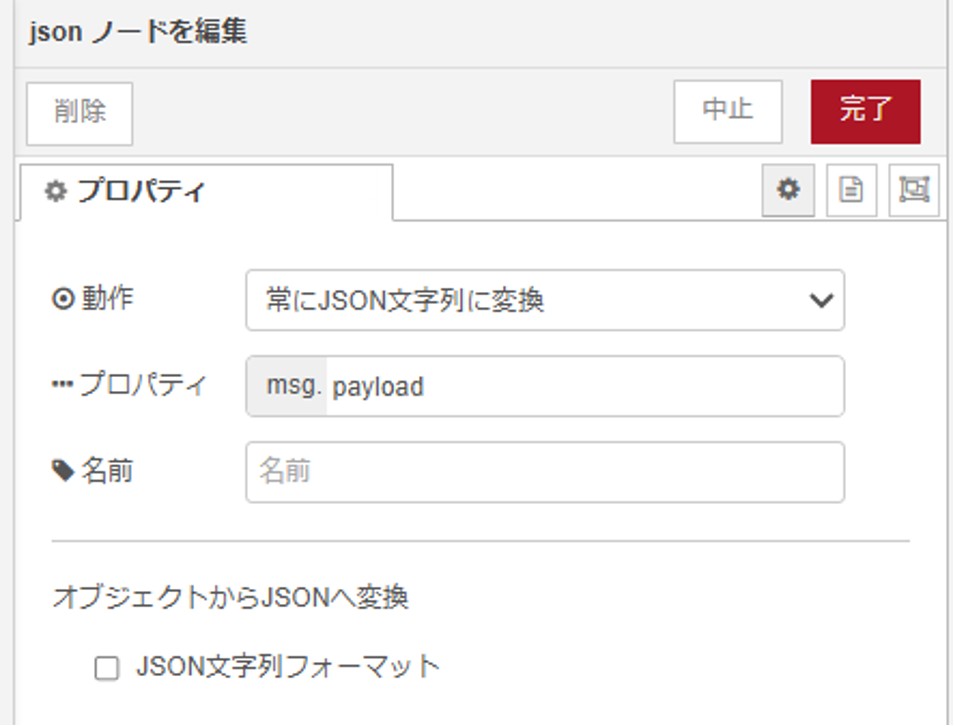
This node converts the JSON object in msg.payload into a JSON string.
i-Reporter settings
Source files
[
    {
        "id": "2ea56ea0b25a0857",
        "type": "http in",
        "z": "3b9d424424fa37f2",
        "g": "beaca7f0903c3bfb",
        "name": "単一選択クラスタ選択肢取得",
        "url": "/Get-tnam",
        "method": "get",
        "upload": false,
        "swaggerDoc": "",
        "x": 360,
        "y": 4900,
        "wires": [
            [
                "2fa4f08a98cd25fd"
            ]
        ]
    },
    {
        "id": "2fa4f08a98cd25fd",
        "type": "template",
        "z": "3b9d424424fa37f2",
        "g": "beaca7f0903c3bfb",
        "name": "ベースJSON",
        "field": "base_data",
        "fieldType": "msg",
        "format": "json",
        "syntax": "mustache",
        "template": "{\n    \"result\": {\n        \"code\": 0,\n        \"description\": \"Success!!!\"\n    },\n    \"apply\": [\n        {\n            \"item\": \"list1\",\n            \"sheet\": {{{payload.sheet}}},\n            \"cluster\": {{{payload.cluster}}},\n            \"type\": \"SetItemsToSelect\",\n            \"value\": \"\"\n            \n        }\n    ]\n}",
        "output": "json",
        "x": 590,
        "y": 4900,
        "wires": [
            [
                "c1b53a7404b91999"
            ]
        ]
    },
    {
        "id": "c1b53a7404b91999",
        "type": "template",
        "z": "3b9d424424fa37f2",
        "g": "beaca7f0903c3bfb",
        "name": "SQL",
        "field": "payload",
        "fieldType": "msg",
        "format": "sql",
        "syntax": "mustache",
        "template": "SELECT\n      player_nam AS item\n    , player_nam AS label\n    , false AS selected\nFROM\n    stddb.t_player\nWHERE\n    tema_nam={{{payload.tnam}}}",
        "output": "str",
        "x": 750,
        "y": 4900,
        "wires": [
            [
                "243b5892a658a184"
            ]
        ]
    },
    {
        "id": "243b5892a658a184",
        "type": "postgres",
        "z": "3b9d424424fa37f2",
        "g": "beaca7f0903c3bfb",
        "postgresdb": "1429ffd5a6603e33",
        "name": "",
        "output": true,
        "perrow": false,
        "rowspermsg": "1",
        "return_on_error": false,
        "limit_queries": "0",
        "limit_by": "payload",
        "limit_value": "1",
        "limit_drop_intermediate": false,
        "limit_drop_if_in_queue": false,
        "outputs": true,
        "x": 900,
        "y": 4900,
        "wires": [
            [
                "4cbadf09c151a876"
            ]
        ]
    },
    {
        "id": "4cbadf09c151a876",
        "type": "change",
        "z": "3b9d424424fa37f2",
        "g": "beaca7f0903c3bfb",
        "name": "データOBJ追加",
        "rules": [
            {
                "t": "set",
                "p": "base_data.apply.0.selectItems",
                "pt": "msg",
                "to": "payload",
                "tot": "msg"
            },
            {
                "t": "set",
                "p": "payload",
                "pt": "msg",
                "to": "base_data",
                "tot": "msg"
            }
        ],
        "action": "",
        "property": "",
        "from": "",
        "to": "",
        "reg": false,
        "x": 1080,
        "y": 4900,
        "wires": [
            [
                "48f412aaa05f34b6"
            ]
        ]
    },
    {
        "id": "48f412aaa05f34b6",
        "type": "json",
        "z": "3b9d424424fa37f2",
        "g": "beaca7f0903c3bfb",
        "name": "",
        "property": "payload",
        "action": "str",
        "pretty": false,
        "x": 1290,
        "y": 4900,
        "wires": [
            [
                "c7f2de45cf870ec8"
            ]
        ]
    },
    {
        "id": "c7f2de45cf870ec8",
        "type": "http response",
        "z": "3b9d424424fa37f2",
        "g": "beaca7f0903c3bfb",
        "name": "",
        "statusCode": "",
        "headers": {},
        "x": 1450,
        "y": 4900,
        "wires": []
    },
    {
        "id": "1429ffd5a6603e33",
        "type": "postgresdb",
        "cfgname": "Localhost",
        "hostname": "localhost",
        "port": "5432",
        "db": "postgres",
        "ssl": false
    }
]
What do you think? I hope this article was helpful to you.
Thank you very much for reading to the end.
If you have any questions, please feel free to contact us at the address below.
We look forward to hearing from you.
i-Reporter: 5.2.24021
Gateway: 2.1.230600
- We are not responsible for any damages caused by systems built based on the contents of this article.
- Please note that CIMTOPS Corporation. will not provide development, technical assistance or support regarding the contents of this article.
-Due to changes in the ConMas Gateway specifications, this integration function may become unavailable.
Author/Contact:
Panasonic FS Engineering Co., Ltd.
■ Contact Information
https://www.panasonic.com/jp/company/pfseg.html
パナソニックFSエンジニアリング株式会社 ソリューション統轄部 IoTソリューション部
担当:大塚 篤 / 村瀬 達也
TEL:03-6714-4521 / 03-6714-4535
メールアドレス:pfseginfo@ml.jp.panasonic.com
*For inquiries, please contact the above email address.
*Please note that due to business circumstances, replies may be delayed.
*Please refrain from making inquiries from sales agents.

This is the editorial department of the Field Document Research Institute!
This blog is operated by CIMTOPS Corporation., which develops and sells the field document electronic solution "i-Reporter."
We will be delivering industry information on a regular basis to help those of you working hard to promote digital transformation in the workplace, so please take a look!